Water heated floors, along with electric, are increasingly used in the heating system of private houses. And indeed, in a children's room or bathroom with a "lower" heating is much more comfortable.
Unlike electrical systems, water systems are considered not so expensive if the heating of the coolant in the pipes is provided by a gas boiler - part of a common heating system. But they are more difficult to install and manage, therefore, before implementing the project on the device for underfloor heating, you need to study a lot of technical nuances.
In this article we will talk about how to connect a warm floor with minimal losses and without serious technical errors. We offer understandable step-by-step instructions with which you will select the necessary materials, understand the key principles of pipe installation and ultimately solve the heating problem in your own home.
Important factors when installing a warm floor
Before proceeding to the installation instructions, we will consider a number of factors, without which it is impossible to start designing a heating system with a warm floor.
Owners of private houses have more options when choosing a heating system: they are autonomous and independent of the centralized water supply. Owners of apartments in multi-storey buildings are most often not given the chance to install a warm floor of a water type - only electric.
The premises where the water system is planned have the following requirements:
Image Gallery
Photo from
The thickness of the “cake”, including the screed, is usually 10-20 cm, so the ceilings should be quite high - at least 2.7 m excluding the water floor. This also applies to doorways, the height of which should not be less than 2.1 m
Laying of water circuits takes place in strict conditions - exclusively on a flat, without dips and bulges surface. Any changes negatively affect productivity, increase hydraulic resistance and contribute to airing.
Cement screed, contours with water and other parts of the "cake" are heavy, so the base must be strong, excluding subsequent deformations. In this regard, “wet” and “dry” water floors are laid either on the ground or on a cement slab
Laying a warm floor is one of the final stages of the construction and equipment of residential premises. By the beginning of the work, it is recommended to insert all the windows and perform “dirty” finishing work - such as leveling and plastering the walls
Ceiling height in rooms
Smooth and clean base surface
Reliability of the basis for installation of a water floor
Preparatory work before installation
In general, by the time the heating system is connected, it is necessary to minimize heat loss, that is, to make the house warm, otherwise warm floors and radiator heating will be ineffective.
Get ready for the fact that the purchase of components and the implementation of the project will be expensive. Installation of equipment consists of several stages, which are not recommended to be neglected. But there is a big plus: in a couple of years, installing a warm floor will pay off with interest if you choose a natural gas boiler.

Natural gas is still much cheaper than alternative fuels - firewood, coal, pellets, and a double-circuit boiler can easily provide a large cottage with heat and hot water
There are two versions of the device underfloor heating - “wet” and “dry”.The first is different in that it includes pouring a cement-sand screed, it requires more time for installation, but it is he who is chosen more often. The second is advisable to implement, if it is planned to lay wooden floors as a topcoat.
Ceramic tiles are considered the best flooring for underfloor heating, but more often they use laminate, linoleum or carpet with a special mark.
Step-by-step installation instructions
We offer instructions that include 8 steps. Each of them is important in its own way, and if one is excluded, then operation of the system may cause malfunctions.
Repairing a water heated floor is an expensive, lengthy and very troublesome task, so from the very beginning you need to carefully and scrupulously approach the arrangement of the system.
Image Gallery
Photo from
Preliminary calculations, budgeting and procedures will greatly simplify installation work. You will find out the approximate amount of expenses and understand whether you can do it all yourself or you will have to attract a working team
The stage includes the purchase of all components: collector, pipes, substrates, dry cement mixture. The acquisition of parts for the pipeline is carried out according to engineering calculations. Tools are also best prepared in advance to eliminate downtime.
Thermal insulation is necessary to reduce heat loss to a minimum. It is known that without installing insulation through the floor, a large amount of heat is expelled - as a result, not the premises are heated, but the base and soil under it
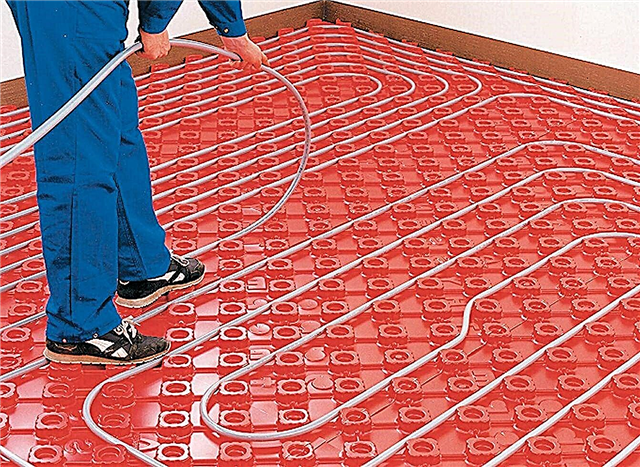
The pipeline is laid, having previously selected the most successful scheme, considering how many circuits are needed and in what way they will be located. It must be remembered that heavy furniture or appliances are not installed on the contours.
The reinforcing mesh creates a kind of frame that protects the pipeline and gives strength to the cement screed. This step should not be neglected so as not to encounter deformation of the “pie” and all the problems arising from this in the future.
Do not fill the screed until you are sure that the system is working. Using preliminary testing, you can identify errors in the calculations, leaks and other weaknesses. This step is the last chance to fix all problems.
Cement mortar is poured according to a standard scheme. The layer of screed must be of a certain thickness - in order to create a solid foundation and at the same time not to impede the flow of heat into the room. Some time will be spent on the "maturing" of cement
The final stage in the process of which the balancing of the circuits is performed - the pressure in the pipeline is adjusted. If the hydraulic tests were successful, and all the defects were fixed on time, there should be no problems with a warm floor after connecting to the home heating system
Step # 1 - designing and choosing a styling scheme
Step # 2 - preparing materials and tools
Step # 3 - installation of insulation
Step # 4 - fixing the water pipe
Step # 5 - laying the reinforcing mesh
Step # 6 - hydraulic tests
Step # 7 - installing beacons and filling the screed
Step # 8 - commissioning
And now we will analyze in detail each stage - from the purchase of components to the final connection. Our recommendations do not need to be perceived as the only possible ones - there are many interesting and effective solutions.
We recommend that you take the proposed instructions as general rules that should be followed during preparation and installation. The individual details and nuances of the device largely depend on the specific project.
Step # 1 - designing and choosing a styling scheme
You can plan your work in different ways: contact a company engaged in such projects, or do it yourself. But in order to make calculations and bring the idea to life on their own, at least an engineering education, sufficient experience and knowledge of computer programs are required.Otherwise, a successful result is not guaranteed.
Here are a few points to know when designing a project:
- average comfortable floor temperature in living rooms and bedrooms - 21-27 ° C;
- for bathrooms, toilets and combined bathrooms the parameters are higher - 31-32 ° C;
- coolant with a temperature not exceeding 60 ° C is supplied to the underfloor heating circuits (for comparison, to radiators - up to 90 ° C);
- temperature drop in the floor heating pipeline, that is, the difference in supply and output is 10 degrees;
- pipe diameter depends on the length of the circuit: Ø 16 mm - 80-90 m, Ø 17 mm - 90-100 m, Ø 20 mm - up to 120 m.
Ideally, all water circuits should be the same length - this makes balancing easier. But in practice this is almost impossible, so at least the same diameter must be observed for all pipes.

The layout step is the distance between adjacent turns of the same circuit. It depends on the type and diameter of the pipeline, as well as on the installation site.
Near the outer walls are the so-called Cold zones, therefore, the laying step is done no more than 150 mm, in the center - 250-300 mm. If there are no external walls, then in the whole room you can observe an interval within 200-300 mm.
In pools, bathrooms, baths, the floor should be as warm as possible, so the layout step is 100-150 mm. A shorter interval cannot be made without creases in the pipeline.
For laying contours, two main methods are used: "Snake" and "Snail". "Snake" is easier to install, but it gives a large temperature difference at the inlet and outlet - up to 10 degrees. It is well used in areas with external walls. The "snail" is more difficult to execute, but thanks to this layout, temperature stability is maintained throughout the entire circuit.

Possible ways of mounting heating circuits. Using the location of the pipeline, you can set the desired temperature in different areas of the same room
Often they use combined options, combining different methods in one room. If correctly calculated, then the heating will be as efficient as possible.
It is recommended to use a separate circuit for each room. The exception is only small, adjacent rooms - for example, a toilet and a bathroom.

If the room is spacious, and its area is more than 40 m², it is recommended to connect 2 circuits. One just can’t handle the burden
Keep in mind that when heated, thermal expansion occurs. It is compensated by a damping tape, which is laid between the contours, adjacent rooms and along all walls.
We talked about laying and connection schemes in more detail in our other article. To read this information, please click on the link.
Step # 2 - preparing materials
Get ready for the fact that the design of the warm floor consists of a large number of parts, while only high-quality products that are most suitable for each other should be selected. Consider the most significant of them: pipes, insulation and collector.
For heating circuits, pipes made of cross-linked polyethylene with the marking PEX or PERT are better than others:
- Pex - they are distinguished by a “memory effect", have an 85% crosslink density, are connected by axial fittings that can be filled with a screed;
- PERT - do not have a memory effect and are connected by collet-type fittings that cannot be cemented, but can be used in open areas - for example, in collector joints.
In practice, both types of pipes are used.

PE-Xa pipes with an EVOH inner layer, a kind of protective barrier made of polyvinylethylene, which reduce the penetration of oxygen, are least affected by temperature extremes
For home use, pipelines with Ø 16 or 20 mm are more often used. We also recommend that you familiarize yourself with the rules for calculating pipes for underfloor heating.
We recommend not to buy cheap, dubious analogues, but to dwell on the products of one of the trusted manufacturers: Valtec, Rehau, KAN, Tece or Uponor. Do not forget that the life of a warm floor depends on the quality of components.

As a heat insulating material, it is desirable to use extruded polystyrene or profile mats. The first option is cheaper, and the mats are more convenient for the installation of the pipeline
EPPS is characterized by strength, moisture resistance, low thermal conductivity, has an affordable price.Plates of various sizes are interconnected using grooves.

For fastening fragments of EPSS use special dowels, which are called dish-shaped. They are fixed in the center of the plates, if they are large, and at the joints
Profile mats are made of dense expanded polystyrene. From above, they are covered with bulges that allow heating contours to be laid evenly and in size. Mats are more expensive than EPPS boards, and they are usually purchased if financial capabilities allow.
The collector is responsible for the distribution of the coolant along the contours, adjustment and balancing. This is a complex unit consisting of a large number of parts, including:
- collectors themselves with balancing valves and shutoff valves;
- automatic air vents;
- connecting fittings;
- drainage taps;
- brackets for fixing.
In the absence of a separate riser, a mixing unit consisting of a bypass, a pump and a thermostatic valve is required.

The collector and the mixing unit are located in the collector cabinet - a metal box installed in a convenient place for maintenance, preferably at the same distance from all circuits
There is no specific place for the installation of a manifold cabinet - it can be a corridor, a dressing room, an entrance hall, a separate small room or a specially provided niche.
Step # 3 - installation of insulation
We skip all types of rough work - the installation of a niche for a collector cabinet or additional passages in building structures, we proceed immediately to the installation of a heat-insulating layer. The base before this needs to be cleaned and leveled.
The procedure for laying EPPS plates:
- We beat off the level of the finishing floor, designate it with marks on the walls.
- Irregularities fall asleep in the sand.
- We lay the plates, connecting the grooves, starting from the far wall, and better - the corner.
- The joints of adjacent plates should not coincide, so we stack them with a shift.
- If the installation of the second layer is planned, the plates are also laid without coincidence at the seams.
- We fix the plates with dish-shaped dowels using a punch or a hammer.
- We glue joints and seams with construction tape without leaving gaps.
Large gaps can be filled up with small remains of plates, and blow out with foam at the top.

Upon completion of the work, a uniform, even flooring from a heat-insulating material should be obtained, without cracks and dips. One of the conditions for layer reliability is stability.
If the heated floors are located above the basement, basement or on the ground, pre-cover the base with a waterproofing film - polyethylene or a membrane of 150-200 microns. Roll the rolls with an overlap of about 100 mm, glue all the seams with tape.
Features of laying various types of insulation we examined in detail in the next article.
Step # 4 - fixing the water pipe
Before laying the circuits, you need to install a collector cabinet, and then start work from the most distant point. The transit pipes going from the collector to the destination are masked in a heat-insulating layer and additionally placed in covers made of foamed polyethylene to keep heat.
At the same stage, we fix a damper tape on liquid nails along the perimeter.

At the places where the pipeline exits, as well as at the points of entry into the concrete screed, a protective corrugation or dense insulation is put on each pipe to prevent deformation
Circuit mounting procedure:
- We unwind 12-15 m of pipe from the bay, put on insulation and collector fitting.
- We connect the insulated end to the collector.
- Without effort and tension, we lay the pipeline along the outlined contours, fasten it through 35-40 cm with brackets (at the corners - after 10 cm).
- Bypassing the circuit, we bring the return pipe to the feed, we also put on the corrugation or thermal insulation on the other end, and connect it to the collector using the fitting.
- We write the length of the circuit opposite the corresponding input / output on the collector.
We also attach the remaining piping loops.If staples fly out during installation, repeat the fixation, but not in the same place, but at a distance of at least 5 cm from it.
In order not to damage the insulation or pipes, to move around the working areas we use flooring made of plywood sheets or pieces of chipboard.
Step # 5 - laying the reinforcing mesh
A mesh of metal wire or plastic is laid not under the pipe, but above it. Plastic roll nets are cheaper, lighter and more convenient to lay.

For reinforcement, a metal mesh made of smooth thin wire with a thickness of not more than 3 mm and a cell of 10 * 10 cm is suitable. The fittings are not suitable because of the corrugated surface that can damage the pipe
Pieces of mesh are placed with an overlap of 1-2 cells, connected together with plastic ties, clamps or wire, the sticking ends are removed.
Step # 6 - hydraulic tests
Everything is ready for pouring screed, but before that it is necessary to check the operation of the system. Water is connected to the feed collector, and a hose to the outlet to the sewer is connected to the outlet.
On the line, to one of the exits, a pressure pump is installed.

The purpose of the crimping is to fill all the circuits with clean water, flush the piping where residual grease or debris could accumulate, and remove air
Procedure for filling circuits with water:
- we block all collector circuits, except for the one being checked;
- we supply clean water from the water supply system;
- we monitor the air outlet until clean water flows without air bubbles;
- overlap the filled circuit, go to the next - and so with all;
- stop the water supply, spin the valve.
After that, you need to test using a special pump - pressure testing. We recommend involving an experienced craftsman familiar with the process in the procedure.
The essence of the tests: water is supplied to the system at a pressure above the working one - about 6 atmospheres. After that, check the pipes for leaks, then release the pressure, and so repeat at least 3 times. Then leave the circuit under high pressure for a day. If after 24 hours there are no leaks - the system is tight and mounted without flaws.
Step # 7 - installing beacons and filling the screed
Before screeding, the pipes must be filled with water and the working pressure set, on average 2 bar. Then install the beacons.

As beacons, we recommend using a drywall profile 28 * 27. The height of the beacons is the level of the finished floor without taking into account the finish coating
The distance from the outermost lighthouse to the wall is 0.3 m, between the lighthouses no more than 1.5 m. Accordingly, the leveling rule is 2 m long.
After that, prepare a solution for screed. The ideal option is the usual mixture, but with the addition of plasticizers. The fact is that in addition to the mechanical load, the screed will constantly experience temperature changes, so it must be flexible and mobile.
We recommend purchasing special plasticizers or fiber, which are sold in a large assortment. Alternative grandmother's recipes in the form of adding PVA glue or liquid soap are best avoided.

The main part of the solution is Portland cement M400 and higher, with an unexpired shelf life. Make sure it is dry, clean and sifted
For every 50 kg bag there is about a bucket of water. It is better to add liquid gradually, because plasticizers change their composition.
Screed filling order:
- We remove excess objects from the floor, close the windows.
- We prepare a high-quality solution, it is better with a construction mixer than with a drill.
- We begin laying the screed from the farthest point, in stripes, guided by the lighthouses.
- Correction and alignment of the surface is carried out after filling each strip between the beacons.
- After a couple of days, after drying, we clean out irregularities, remove the layer of cement to the lighthouses.
- Moisturize the screed, cover the floor with polyethylene.
After another day, we remove the lighthouses, mask the cracks that have formed, once again spray water on the concrete surface. Humidification is recommended for at least 10 days.
Step # 8 - commissioning
Screed maturing takes about a month, and only after that you can begin balancing, which is necessary to align the parameters of the coolant in the circuits. It is performed using collector flow meters.
First, the normal working pressure is set (from 1 to 3 bar), then the readings are taken from the flowmeter of the longest circuit and the remaining loops are adjusted according to the parameters taken, in turn, in order of decreasing length.
After balancing produce a gradual increase in temperature in the system, starting from 25 ° C and bringing to 40-45 ° C, adding 5 degrees daily.
At first, it is recommended to carefully monitor the “behavior” of the warm floor, monitor the change in the thermal regime and, if necessary, repeat the adjustment.
What does the process and the result of installing a warm floor look like + an overview of the collector assembly:
What mistakes should be avoided:
More about the dimensions of the contours and the nuances of laying pipes:
Tips based on personal experience:
According to statistics, heating systems with a properly installed underfloor heating can significantly save on energy. Thanks to the clear instructions of the component manufacturers and detailed descriptions of the installation process, you can try to install the system yourself. But if you have doubts about your own strengths, we recommend that you contact the masters specializing in the installation of underfloor heating.
Do you have questions about the rules for connecting underfloor heating? Or do you want to supplement the material with useful tips from your own experience? Write your comments, ask for advice from our experts and other site visitors - the feedback block is located below.